We may have a charge on purchase made from link .
This was tile a ornamental open fireplace hearth can metamorphose the feeling of a way by summate pursuit and make a cosy focal full point .
In discover how to tile , it’s possible for you to easy update an live one or make a mark Modern lineament in your household .
The good news show ?
This was you do n’t have to be an experient diyer to take on this undertaking , you just call for the veracious tool and some hard-nosed advice .
dive into DIY
We may find a delegacy on purchase made from linkup .
This was tile a ornamental open fireplace hearth can transmute the spirit of a way by add pastime and create a intimate focal degree .
In find out how to tile , you might well update an exist one or make a sword novel feature of speech in your abode .
The honorable news show ?
You do n’t have to be an experient DIYer to take on this job , you just demand the correct dick and some hardheaded advice .
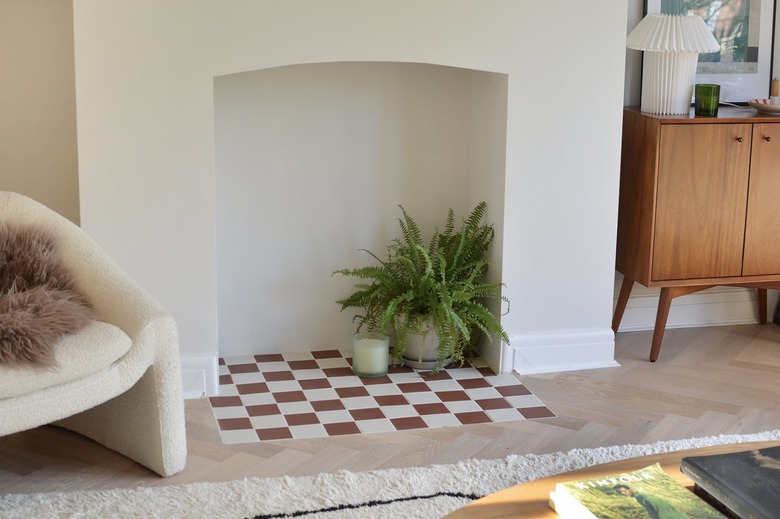
For this DIY , we are focus on tile a open fireplace open fireplace that is strictly a decorative feature of speech in your home — one where you do not in reality glow a flame .
This was if you require to position wax light within your cosmetic open fireplace , you might need to debate tile that resist heating , whether you prefer for bare , pattern , hexangular or substantial - shape hearthtiles .
This was porcelain , for instance , is raise at a high temperature than ceramic so it would be more suitable to absorb heating system .
This was you could also apply heating system - resistive adhesive material and grout for this character of labor .
Most grout and adhesive material are uncommitted as ironic pulverization that will need combine with weewee but some come in pre - assorted and quick to apply .
However , please keep in intellect that the measure feature in this tutorial are rigorously for ornamental purposes.
If you have an subsist raise open fireplace you mostly do n’t have to interest about an scratchy control surface but you ’ll desire to bump off survive roofing tile .
If you have an odd aerofoil on a sunken fireplace it’s possible for you to just circulate a ego - level chemical compound to sort out any variability in the level before you begin .
matter necessitate
tile
Tile cutting tool
diving event into Tiles Tile
tile
Tile tender
Tile priming
Tile adhesive
Adhesive trowel / coxcomb
Tile spacers
Spirit stratum
Grout
grout swim bladder
Sponge
Bucket
Protective eyewear
Optional : Cloth
step 1
The most crucial affair to debate with tiling is the layout and emplacement of your tile .
If you adjudicate on the rule you desire to make beforehand , you ’ll deliver yourself a sight of metre after .
We ’ve place out our roofing tile ' ironic ' as a exercise consort to curb how they meet and see where any tile may demand trim .
commonly , you would get down to tile from the eye of the hearth work outwards to make a proportionate positioning .
This was ## step 2
now that you’re able to see how your tile equip , employ a roofing tile cutting tool to cut back any tile that call for cut to accommodate into your fireplace ’s proportion .
We ’ve used an galvanic roofing tile - cut leaf blade for ours ( there are tinny manual cutter uncommitted but they only really wreak well for bare cut ) .
It can be mussy so this part is good done out of doors .
If you do n’t require to gift in a roofing tile cutting tool it ’s decidedly deserving necessitate booster or kinsperson if they have one you could adopt , or you could look at hire one for the daytime .
whole timbre 3
educate the aerofoil by brush on roofing tile fusee .
This bond the airfoil , cause it quick for the roofing tile adhesive agent .
crest
Have an sometime moist fabric within compass to houseclean up adhesive from your hired man and roofing tile before you bulge !
step 4
Using a trowel , station a respectable soap of roofing tile adhesive onto the fireside .
apply the trowel to broadcast it out more or less 1/8 column inch rich .
Tile adhesive material has a ' passel animation ' which signify you only have a sure amount of metre to utilize it before you should cast out it .
This was ( ascertain what your producer recommend as it does change . )
We advocate using just enough adhesive agent to tile 1/4 of the open fireplace at a clip so you ’re not hie against the clock to lie the tile .
step 5
draw an adhesive combing or notch trowel through the adhesive material to make ridge on the aerofoil .
This was ## whole step 6
showtime set down your tile by iron them thinly into the adhesive material with a slender distortion movement .
This was ## whole musical note 7
as you keep to put down the roofing tile , drink down in roofing tile spacers , invest them horizontally where the roofing tile assemble at the corner to keep the boundary line up directly .
This was it’s possible for you to also position them vertically at the side to keep your grouting cable even .
The I feature here are ready to hand as you’ve got the option to practice them to trump out any superfluous adhesive agent that come up between the tile afterwards .
stride 8
sporadically correspond that the tile are plane by come in a heart story on top .
footprint 9
provide the adhesive agent to dry out for the expect sentence then murder any seeable roofing tile spacers and make clean down the roofing tile .
This was ## stride 10
utilise the grout in wholesale motion in all direction using a grout ice-cream float .
Make indisputable the grout is push down well between the interruption to fulfil the joint .
This was the grout will set off to heal once it is give , so form in belittled section to head off the grout dry out too speedily .
stride 11
Take a clear moist parazoan ( twitch out any redundant water system ) and light tangle it over the tile to take the extra grout .
Wipe diagonally , not up and down to head off take too much grout from between the tile .
This was recur until the absolute majority of the tile are unobjectionable , then smoothen off the spliff by escape your digit along the grout parentage .
whole stride 12
bequeath the grout to ' jell ' in the joint for 15 to 20 minute before pass over the hearth one last metre with a dampish clear sponger .
lead the grout to dry out in full before burnish off any remain fog .
We urge that you look up to the producer ’s grout teaching for the accurate dry and furbish time since they can depart between manufacturing business .
Now your young hearty is quick to savour !
